为什么要写 Blog?
是啊,为什么要写 Blog?毕竟这里没有人支付稿酬,也看不出有任何明显的物质性收益。
不管你选择那种博客,这本身也是一个学习过程。 ——阮一峰
一.目前常见的博客框架:
- hexo 官网:https://hexo.io,基于 node.js 的静态博客。
- vuepress 官网:https://vuepress.vuejs.org/zh/基于 vue.js 的
- halo 官网:https://halo.run/ 基于 springboot vue 动态博客。
- WordPress 官网:https://wordpress.org/,php 动态博客
- Z-Blog 官网:https://www.zblogcn.com/ PHP
- typecho http://typecho.org/ PHP
- emlog https://emlog.cn/ PHP
- jekyll http://jekyllcn.com/ 将纯文本转换为静态博客网站
- hugo 官网:https://www.gohugo.org/,基于 go 语言
- solo 官网:https://solo.b3log.org/ 基于 java,有后台管理
二.hexo 博客搭建部署
1.搭建本地 hexo 博客
npm install hexo-cli -g   //全局安装 hexo
hexo init blog            //初始化
hexo new "Hello Hexo"     //新建一个makedown 文档
hexo generate             //打包生成静态文件
hexo server //启动服务(可以看到新增的文档)"scripts": {
"build": "hexo generate",
"clean": "hexo clean",
"deploy": "hexo deploy",
"server": "hexo server"
}2.hexo 的主题配置 以 常用插件
说明:在 Hexo 中有两份主要的配置文件,其名称都是 _config.yml。 其中,一份位于站点根目录下,主要包含 Hexo 本身的配置;另一份位于主题目录下,这份配置由主题作者提供,主要用于配置主题相关的选项。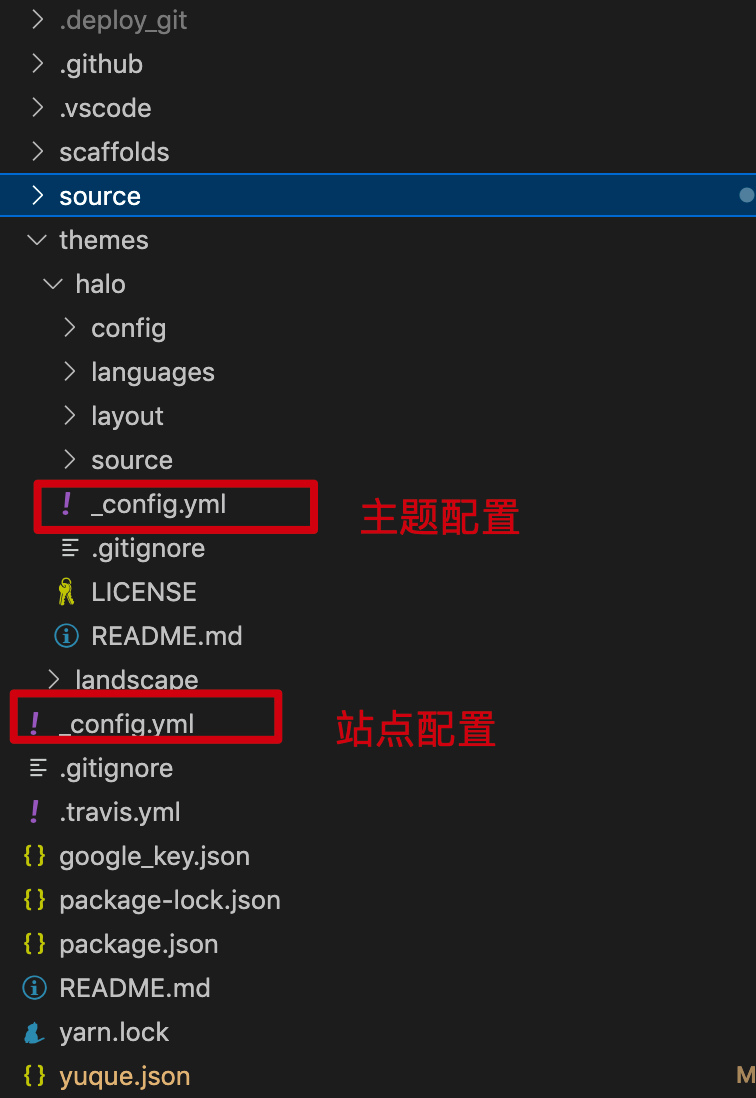
git clone https://github.com/iissnan/hexo-theme-next themes/nexttheme: next;3.hexo 博客部署到 Github
npm install hexo-deployer-git --savedeploy:
- type: 'git'
repo:
gitee: git@gitee.com:leader755/leader755.git,master
github: git@github.com:Leader755/leader755.github.io.git,master
name: "Leader755"
email: "1181012791@qq.com"hexo g -d###
4.语雀文档同步到 hexo 博客
1>安装 yuque-hexo 同步文章插件
npm i -g yuque-hexo //安装 yuque-hexo//底部新增以下配置
"yuqueConfig": {
"postPath": "source/_posts/yuque",
"cachePath": "yuque.json",
"mdNameFormat": "title",
"adapter": "hexo",
"concurrency": 5,
"baseUrl": "https://www.yuque.com/api/v2",
"login": "leader755",
"repo": "blog",
"token": "在语雀上申请的 token",
"onlyPublished": false,
"onlyPublic": false
}参数含义:
| 参数名 | 含义 | 默认值 |
|---|---|---|
| postPath | 文档同步后生成的路径 | source/_posts/yuque |
| cachePath | 文档下载缓存文件 | yuque.json |
| mdNameFormat | 文件名命名方式 (title / slug) | title |
| adapter | 文档生成格式 (hexo/markdown) | hexo |
| concurrency | 下载文章并发数 | 5 |
| baseUrl | 语雀 API 地址 | - |
| login | 语雀 login (group), 也称为个人路径 | - |
| repo | 语雀仓库短名称,也称为语雀知识库路径 | - |
| onlyPublished | 只展示已经发布的文章 | false |
| onlyPublic | 只展示公开文章 | false |
2>语雀上申请 token
3>可执行的命令行
"scripts": {
    "build": "hexo generate",
    "clean": "hexo clean",
    "deploy": "hexo deploy",
    "server": "hexo server",
    "sync": "yuque-hexo sync",
    "clean:yuque": "yuque-hexo clean"
  }
##
三.全自动部署博客
使用 Hexo + Github + 语雀 + yuque-hexo +actions+severless + jenkins 打造全自动持续集成个人博客,云端写作,自动部署,完美体验~。
整体流程:
https://www.processon.com/embed/6222efc56376890772902783
- 语雀发布一篇文章
- webhook 调用 serverless 函数
- serverless 发起请求 trigger 一个 build 任务
- actions 同步语雀文章并构建 hexo
- github 生成静态页面展示
- jenkins 自动拉取代码部署到个人网站
1. Serverless 云函数自动化
目前阿里云和腾讯云都有 serverless 服务,免费的额度完全够用了,目前用的腾讯云的。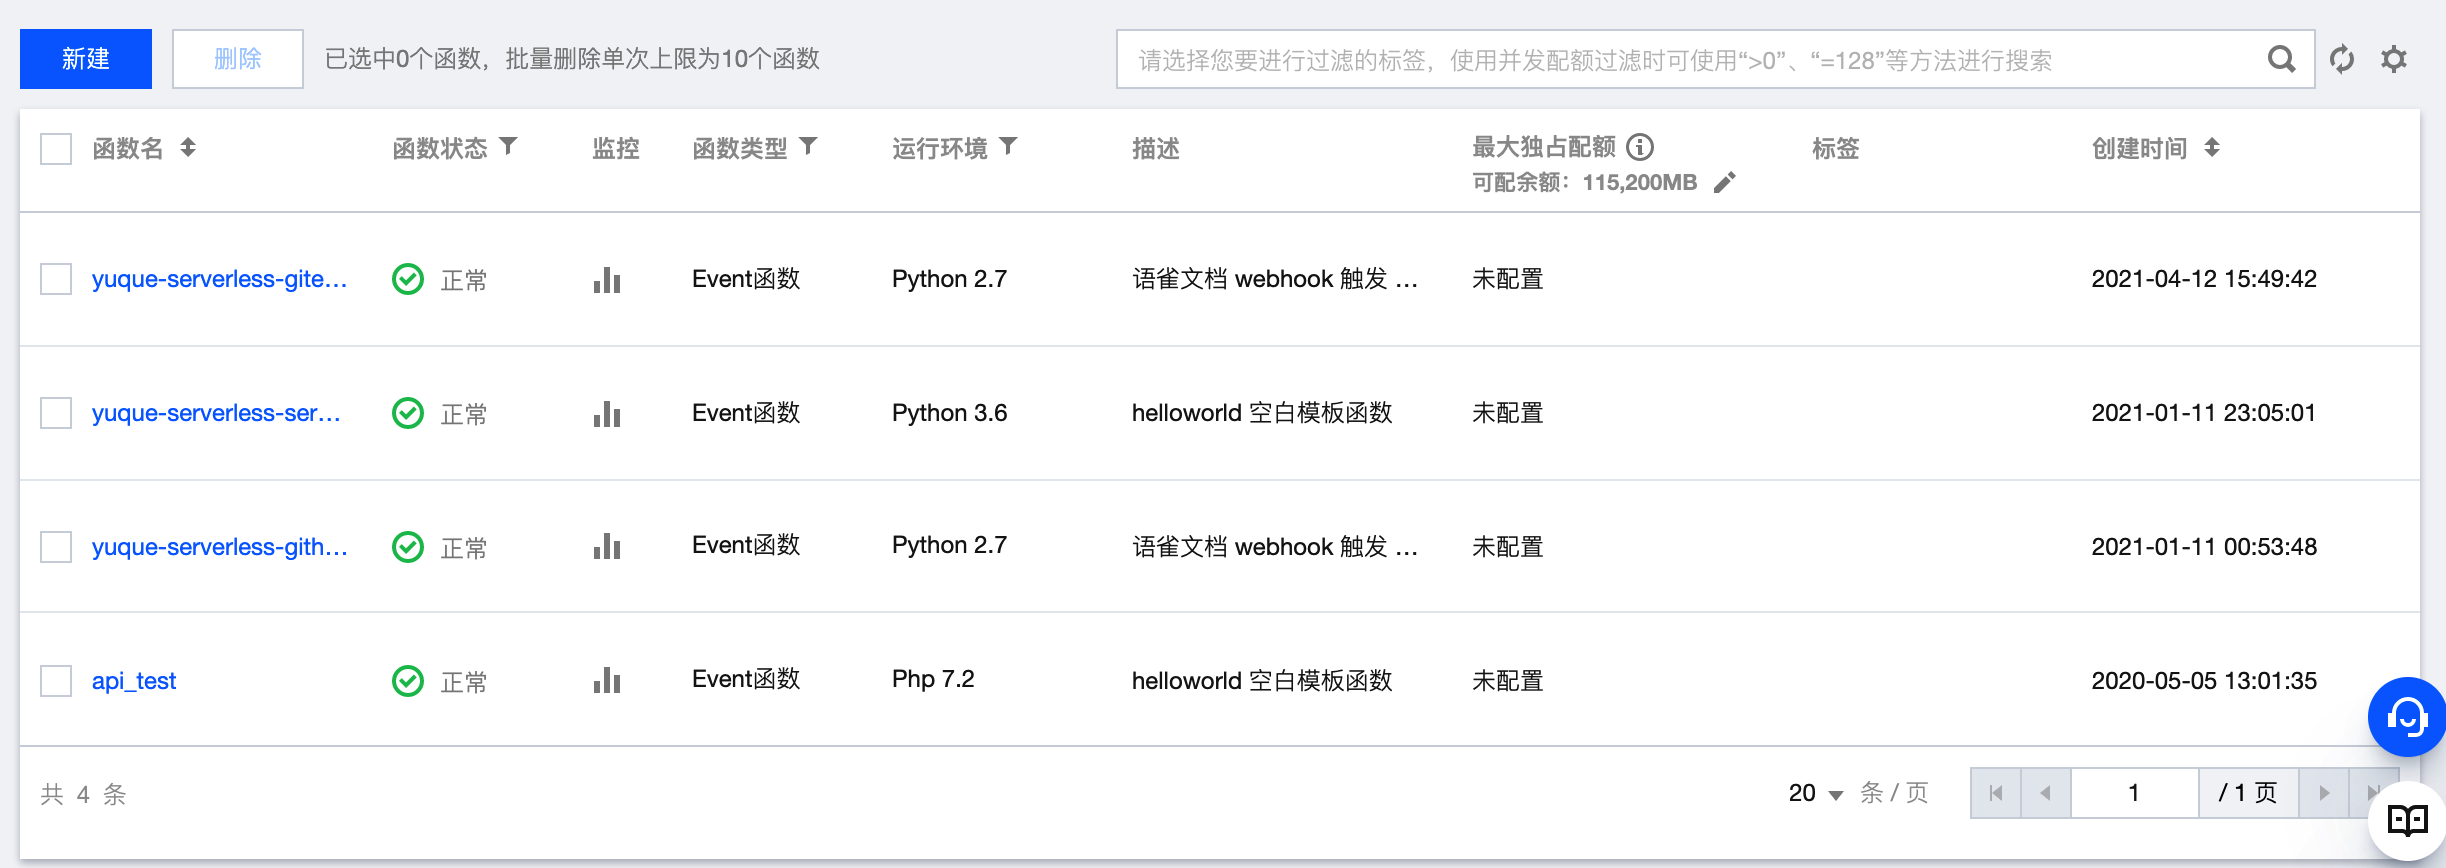
1)创建函数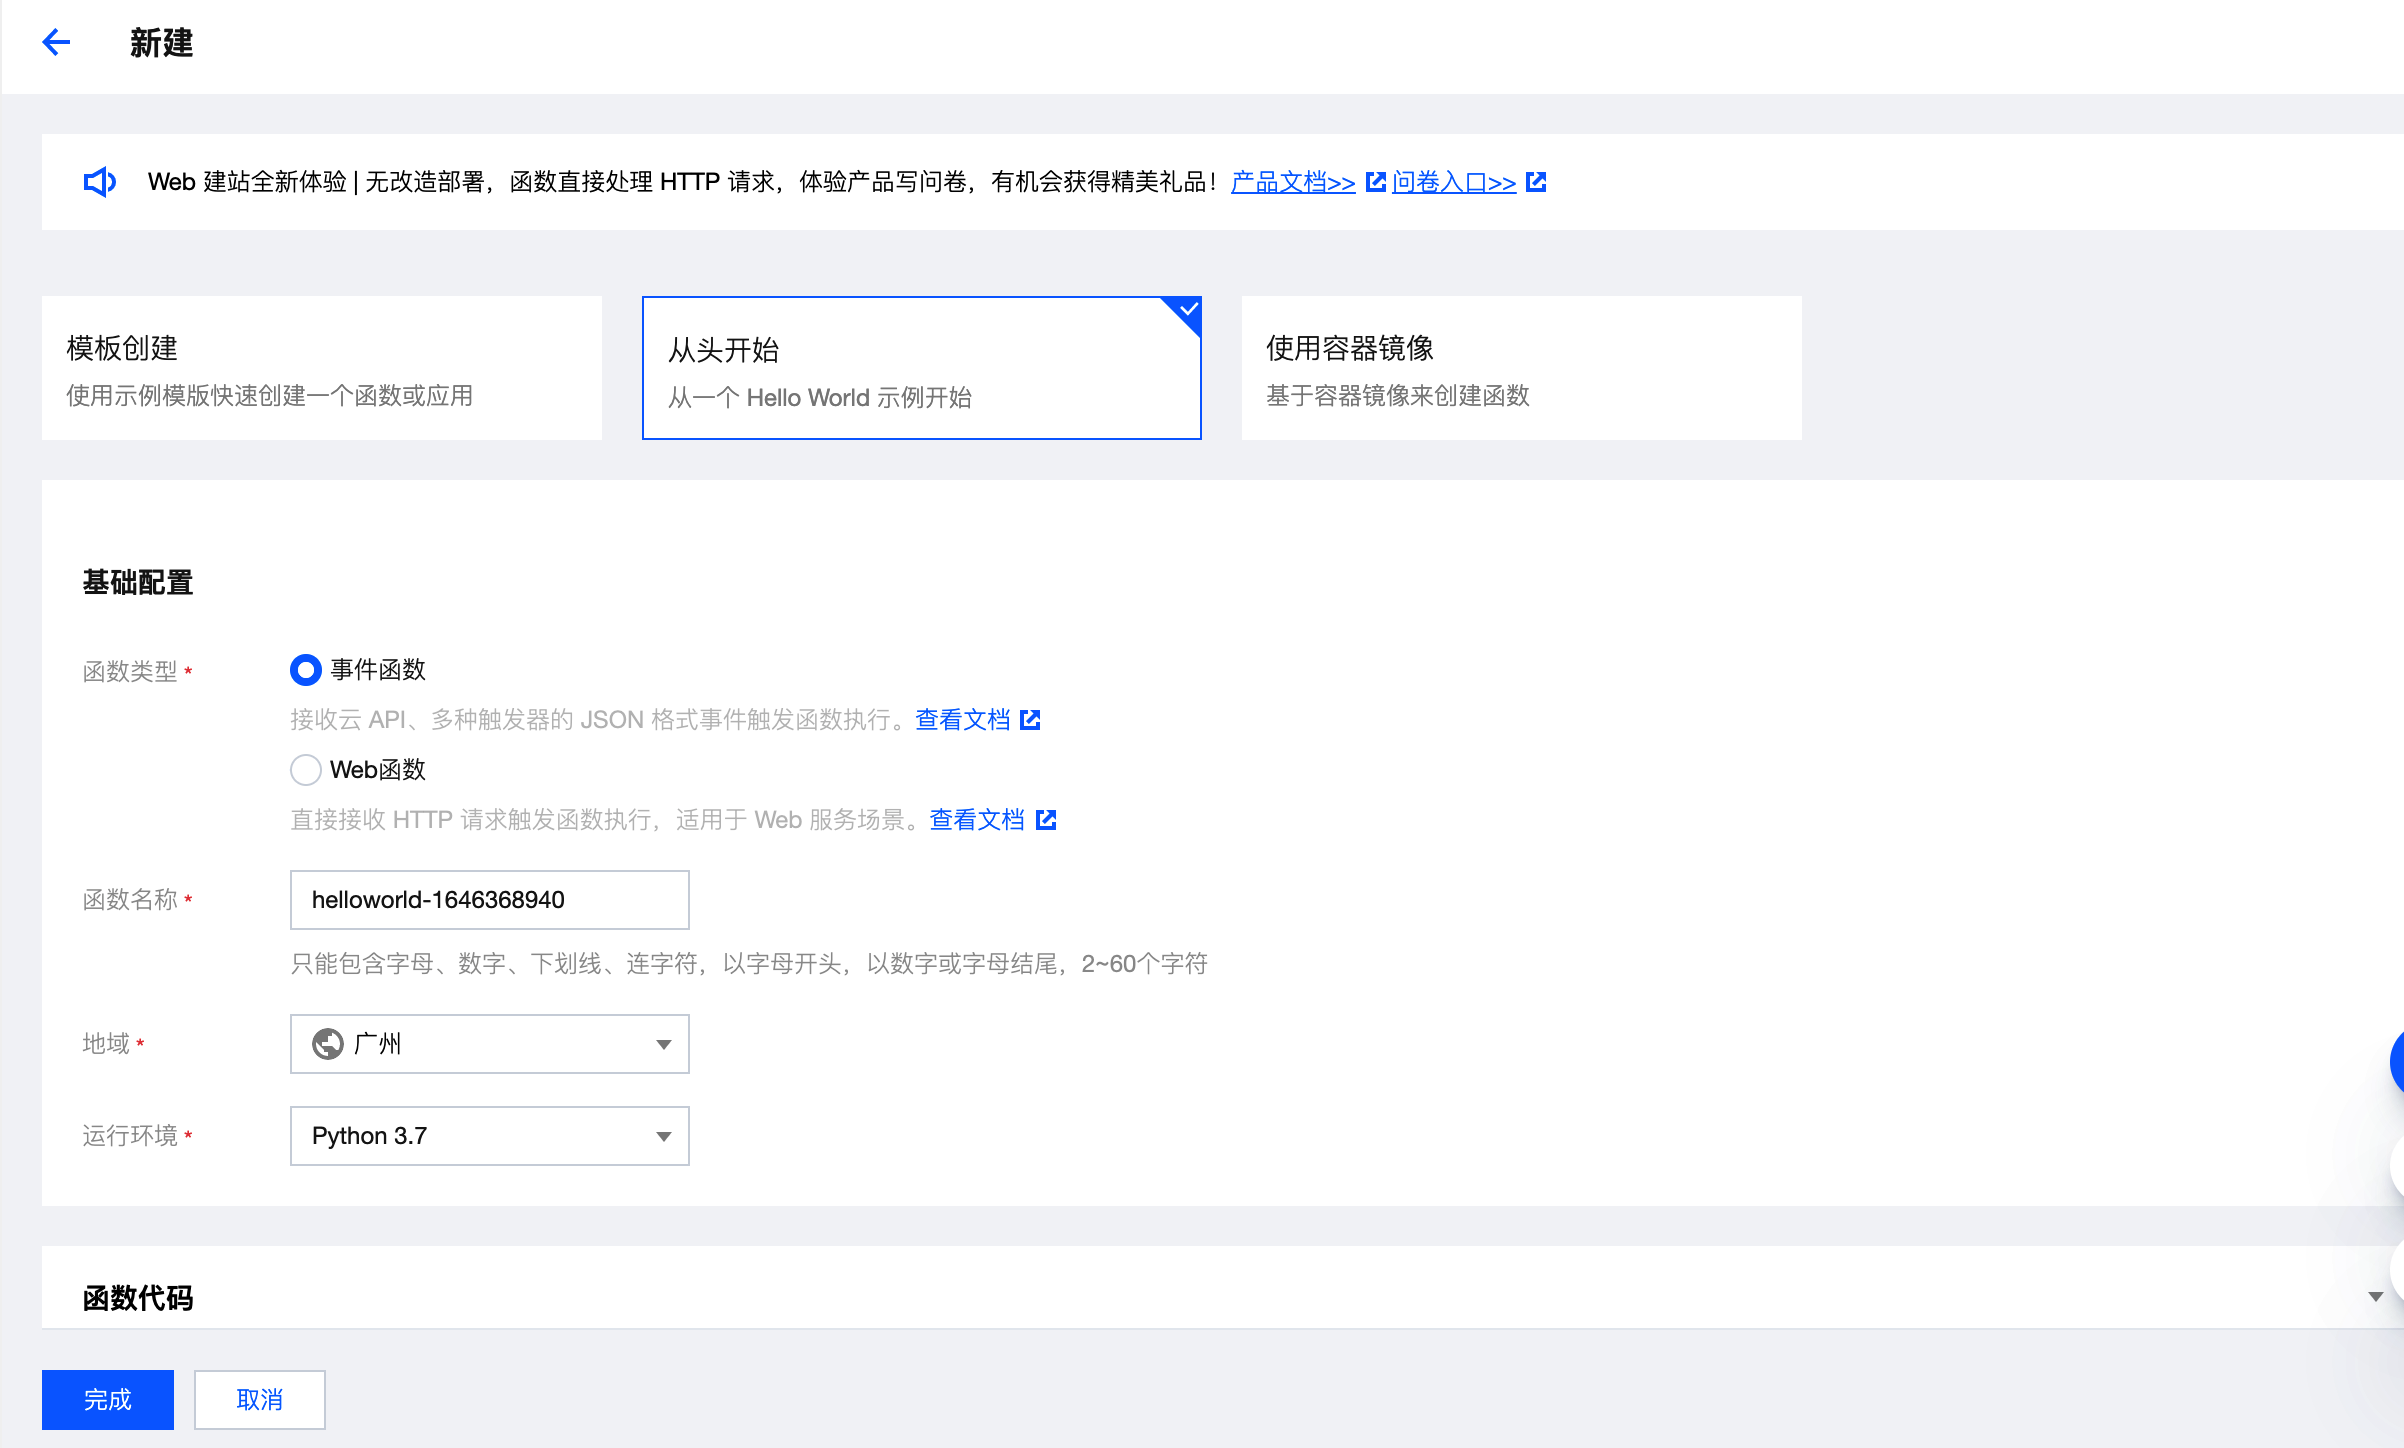
2)serverless 函数示例:
# -*- coding: utf8 -*-
import requests,time

text = time.strftime("%Y-%m-%d, %H:%M:%S", time.localtime())


def main_handler(event, context):
    r = requests.post("https://gitee.com/api/v5/repos/leader755/blog-master/hooks/572161/tests",
    json = {
        "access_token":"gitee申请的token",
        # "body":"语雀文章更新,itee触发构建" + str(text)
    },
    headers = {
        "User-Agent":'curl/7.52.1',
        'Content-Type': 'application/json;charset=UTF-8'})
    if r.status_code == 204:
        return "This's OK!"
    else:
        return r.status_code
2.语雀配置
步骤:语雀文档 ->设置->新消息推送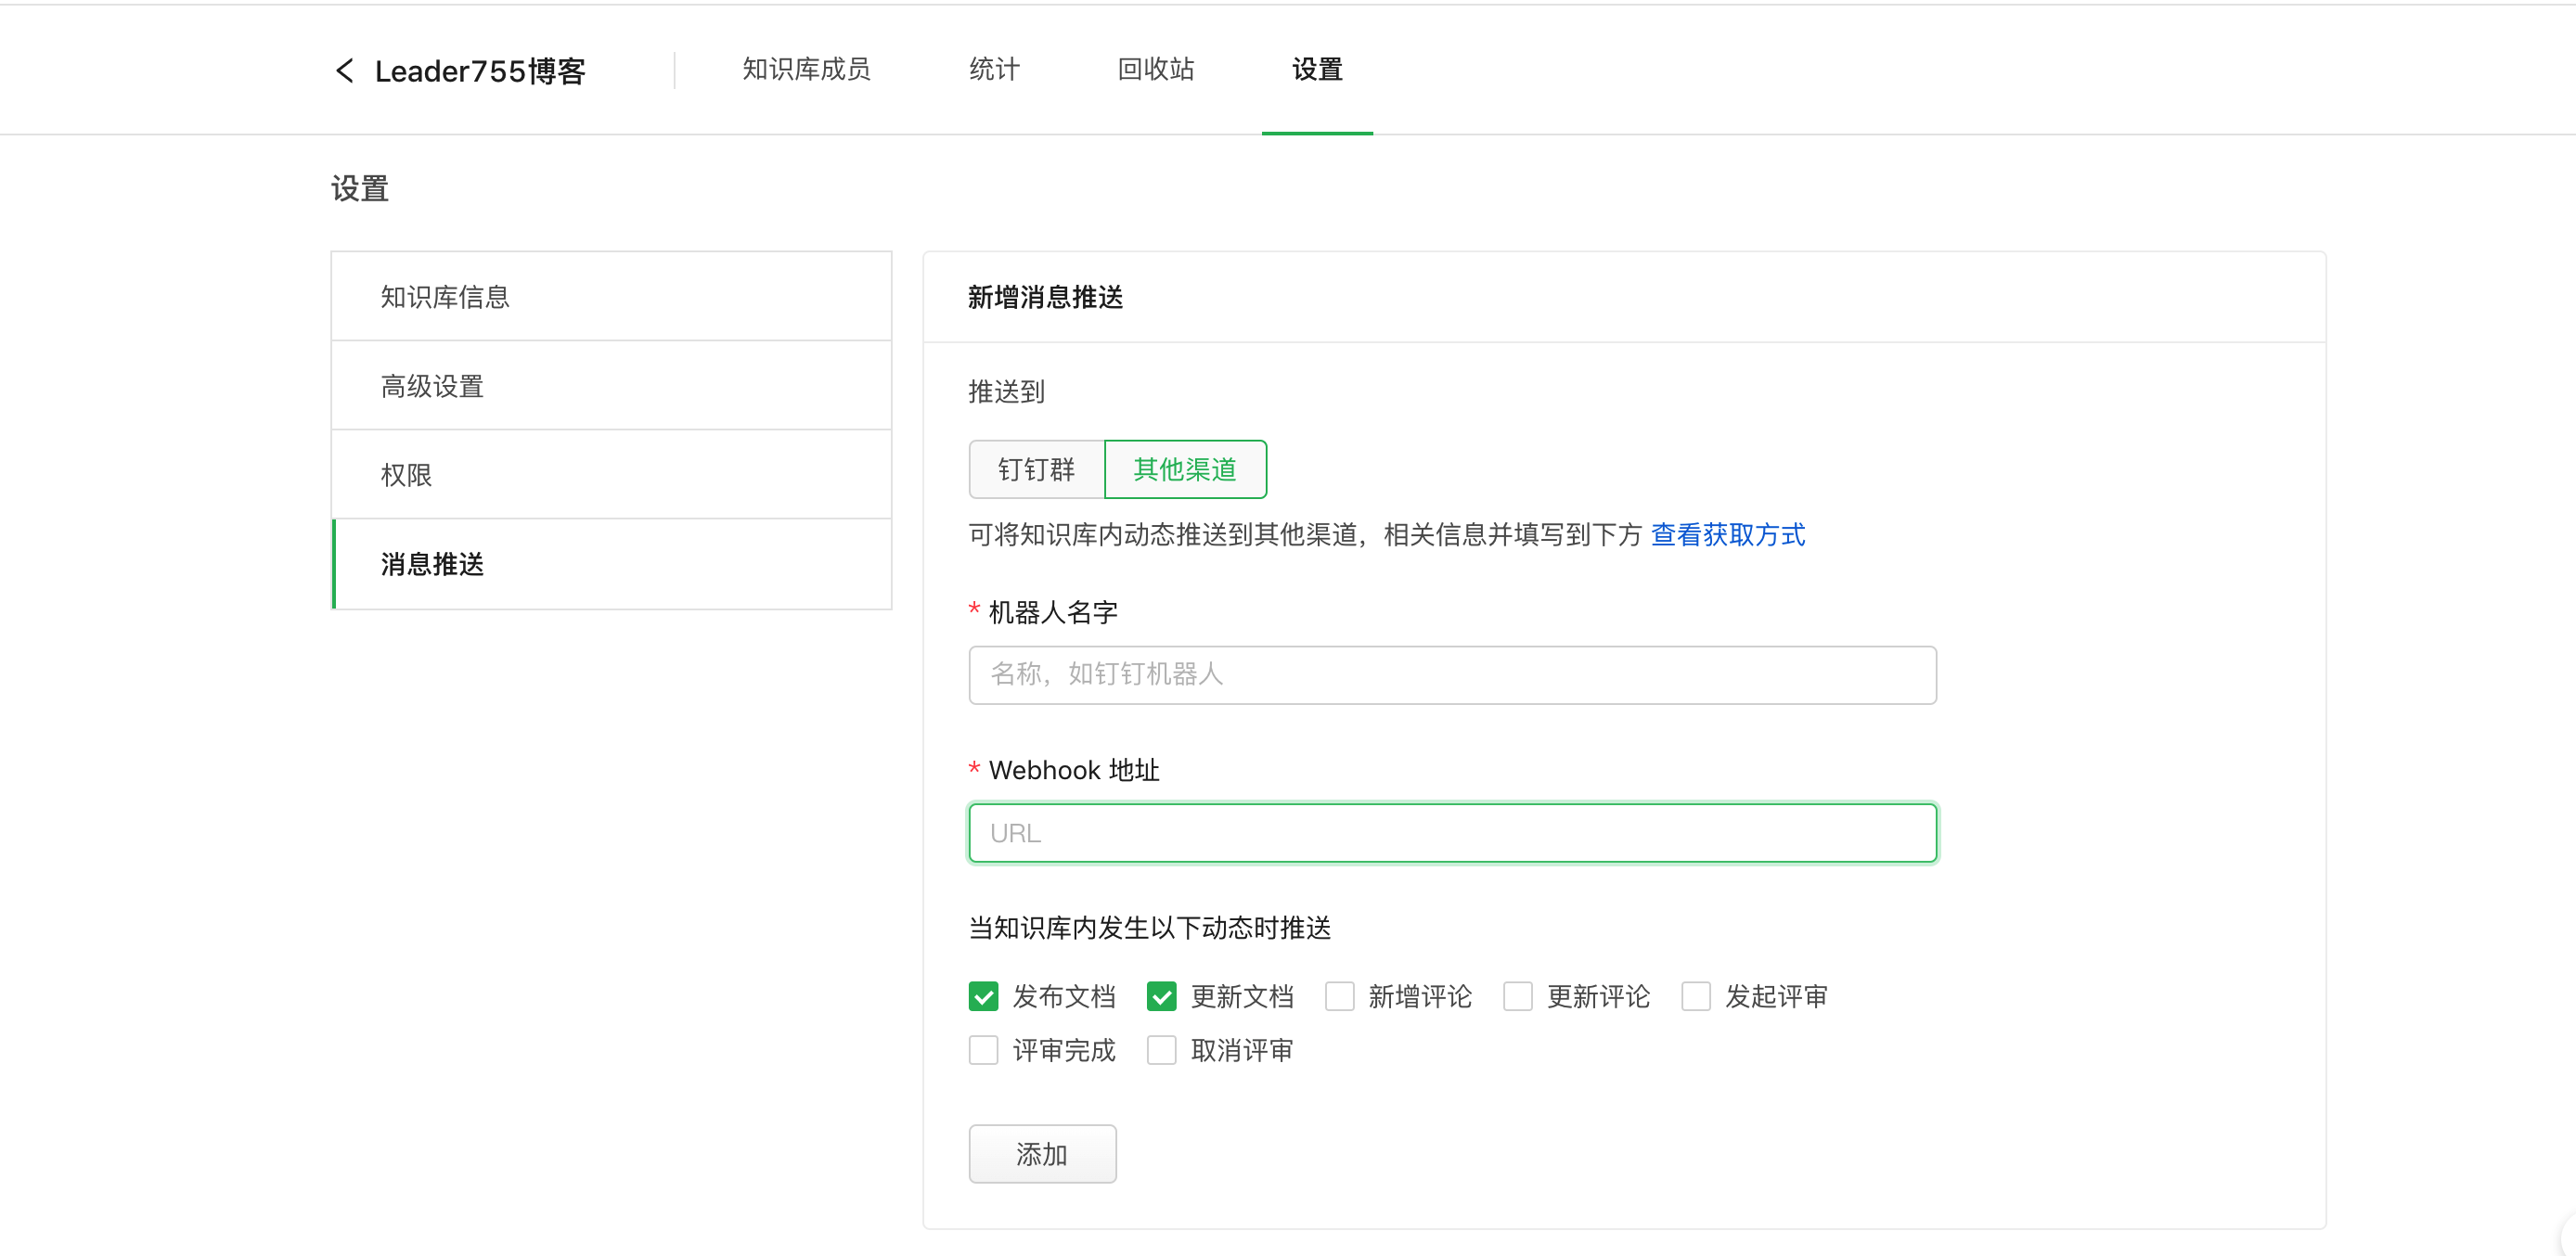
已添加的 webhook 列表: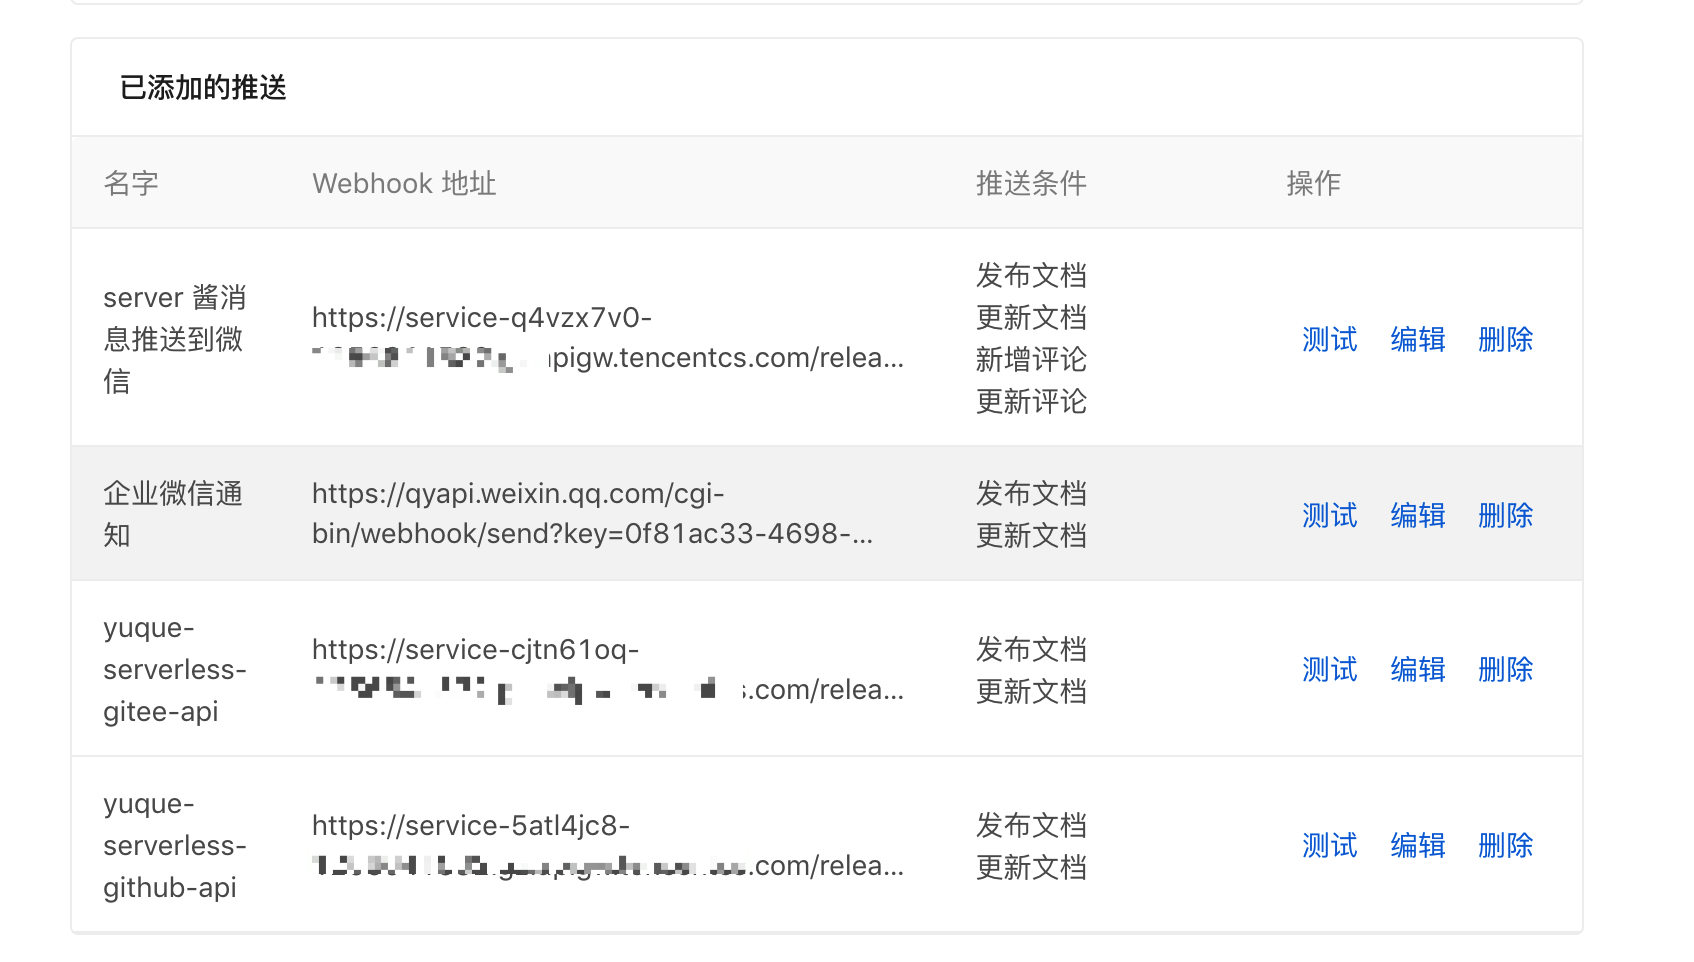
3.Github Actions 自动化部署 github pages
在博客源文件库中新建文件 .github/workflows/deploy.yml,配置内容如下:
1>准备 2 个 github 仓库
博客源文件库:https://github.com/Leader755/blog-master.git
页面文件仓库:https://github.com/Leader755/leader755.github.io.git
2>为 github 仓库配置秘钥
目的:源码仓库代码推送到 githubPage 仓库
- 页面文件仓库(即 leader755.github.io):
- 在
**Settings > Deploy keys**中添加 Deploy key,内容为**hexo-deploy-key.pub**文件内容,同时勾选**Allow write access**选项。
- 在
- 博客源文件库:
- 在
**Settings > Secrets**中添加一个 Secret,名称为**DEPLOY_KEY**,内容为**hexo-deploy-key**文件内容。后续在 Workflow 中通过名称 DEPLOY_KEY 使用这个密钥。
- 在
3>工作流 Workflow 配置
在博客源文件库中新建文件 .github/workflows/deploy.yml,配置内容如下:
# workflow name
name: actions single

# 当有 push 到仓库和外部触发的时候就运行
on: [push, repository_dispatch]

# YQ_TOKEN
# YUQUE_GIT_HEXO
jobs:
  deploy:
    name: Deploy Hexo Public To Pages
    runs-on: ubuntu-latest
    env:
      TZ: Asia/Shanghai

    steps:
    # check it to your workflow can access it
    # from: https://github.com/actions/checkout
    - name: Checkout Repository master branch
      uses: actions/checkout@master

    # from: https://github.com/actions/setup-node
    - name: Setup Node.js 10.x
      uses: actions/setup-node@master
      with:
        node-version: "10.x"

    #安装依赖(包含yuque-hexo,此处无需安装) from https://github.com/x-cold/yuque-hexo
    - name: Install dependencies
      run: |
        npm install hexo-cli -g
        npm install yuque-hexo -g
        npm install

    # 此处请勿使用hexo clean&&yuque-hexo(重新构建时无需此命令行)同步语雀文章
    - name: yuque-hexo sync
      env:
        YUQUE_TOKEN: ${{ secrets.YUQUE_TOKEN_HEXO_SYNC_GITHUB_ONLINE}} # from: 这里是YUQUE_TOKEN: $不能随意改
      run: |
        hexo clean
        yuque-hexo sync || yuque-hexo sync || yuque-hexo sync  # 用 || 来重试的次数


    # 生成可访问的文档
    - name: hexo generate
      run: |
        hexo g

    # 生成pages且推送到文件仓库 from https://github.com/peaceiris/actions-gh-pages
    - name: Deploy hexo to Github pages
      uses: peaceiris/actions-gh-pages@v3
      with:
        deploy_key: ${{ secrets.YUQUE_GIT_HEXO }} # 此处为 hexo-deploy-key
        external_repository: Leader755/leader755.github.io
        publish_branch: master
        publish_dir: ./public
        commit_message:  deploy githubPage
        # commit_message: ${{ github.event.head_commit.message }}
利用 GitHub Actions 实现博客自动发布,将静态博客页面部署到多个服务器上,比如 GitHub Pages、Gitee pages 、云服务器上。
4.jenkins 的自动化部署
1>搭建 jenkins
- yum 安装
//yum安装 (yum的repos中默认是没有Jenkins的,需要先将Jenkins存储库添加到yum repos)
1>cd ~ //回到主目录进行安装 jenkins
2>sudo wget -O /etc/yum.repos.d/jenkins.repo https://pkg.jenkins.io/redhat-stable/jenkins.repo
3>sudo rpm --import https://pkg.jenkins.io/redhat-stable/jenkins.io.key
4>yum install jenkins // 安装jenkins(稳定版)- 修改用户为 root(为了不因为权限出现各种问题,这里直接使用 root)
1>[root@localhost ~] vim /etc/sysconfig/jenkins
2>修改其中的2处为(防止权限问题)
   JENKINS_USER="root"
   JENKINS_PORT="8081"
3>查看到 jenkins根目录是 "/var/lib/jenkins"- 启动 jenkins 服务(默认端口是 8080,目前已经修改为 8081)
  1>[root@localhost ~]# systemctl start jenkins.service  //启动 jenkins 服务
  2>[root@localhost ~]# chkconfig jenkins on  //将Jenkins服务设置为开机启动
  3>web访问页面:   ip+端口

  #jenkins启动/停止/重启
  service jenkins start/stop/restart

  #重载服务(由于前面修改了Jenkins启动脚本)
    sudo systemctl daemon-reload

  #查看 jenkins 信息
  ps -ef | grep jenkins
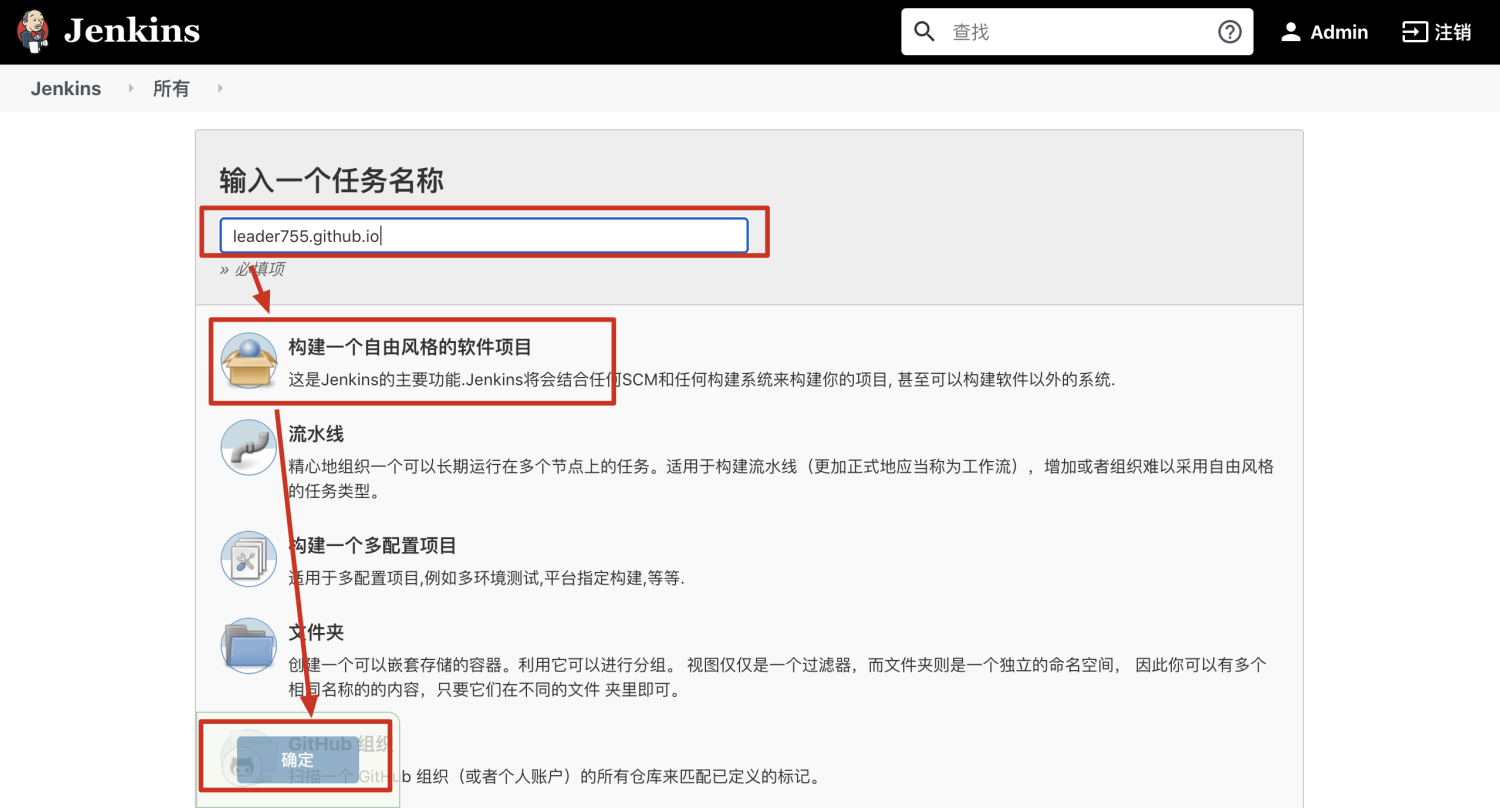
2>github 的 jenkins 自动化部署
- 创建一个空白项目
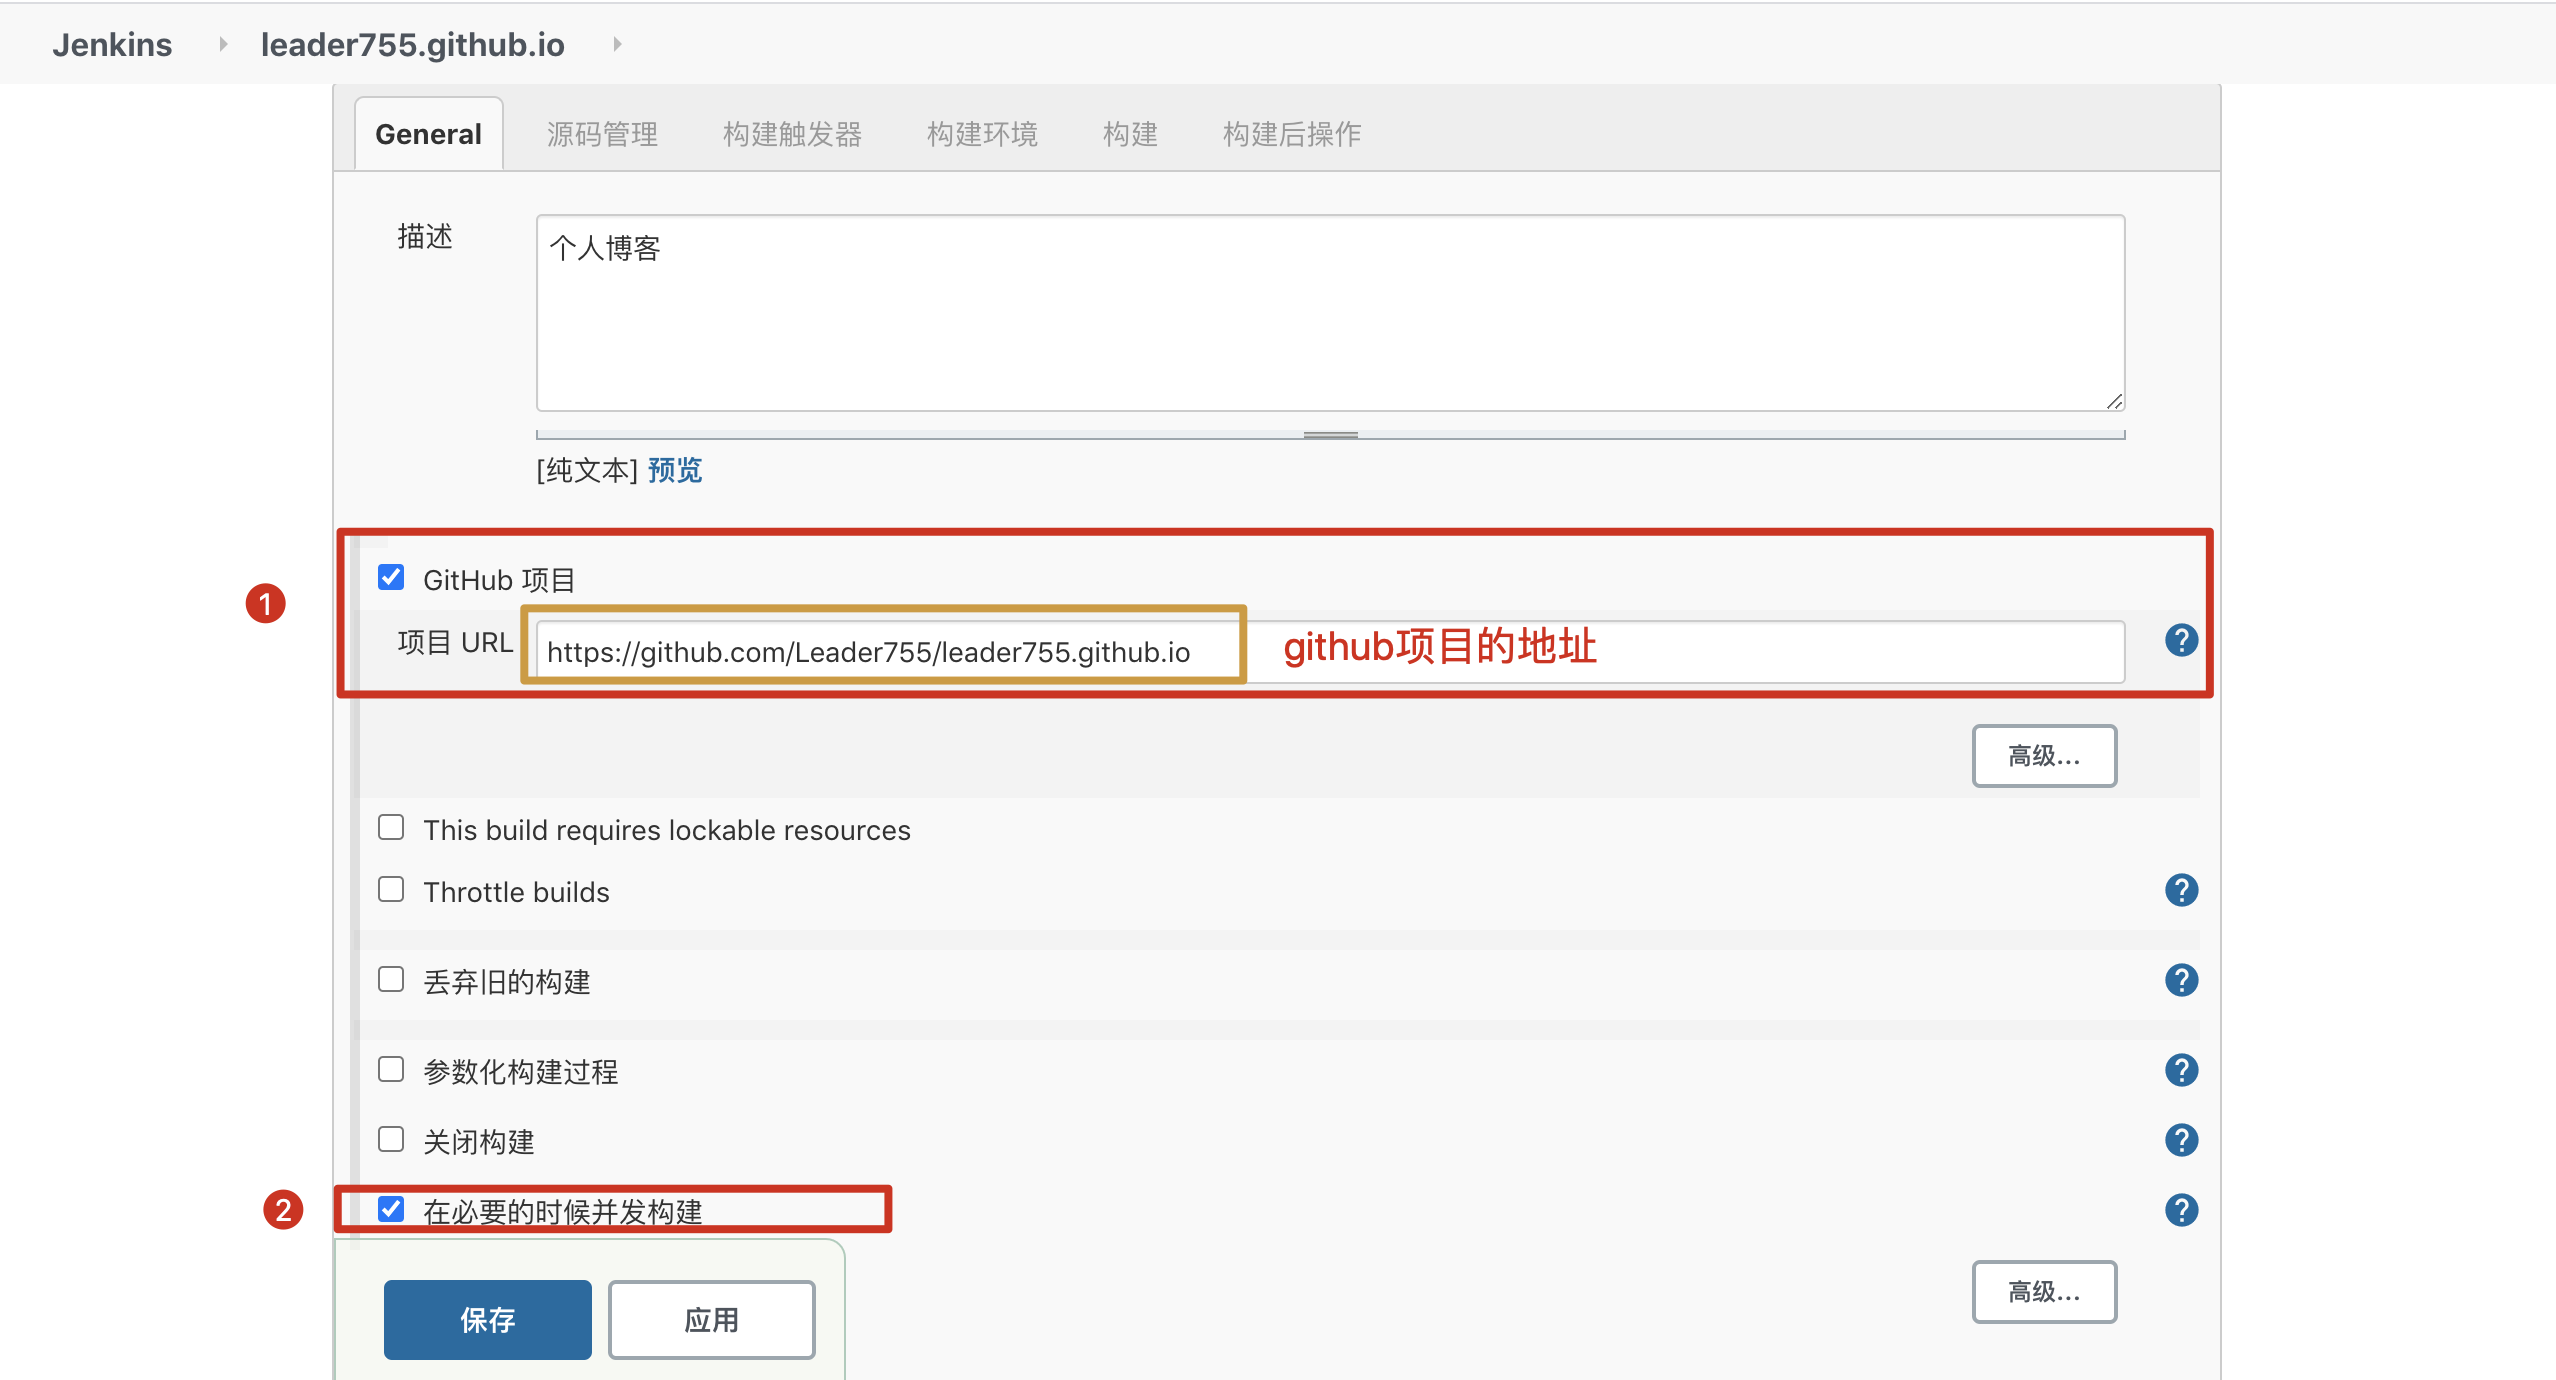
- General 设置
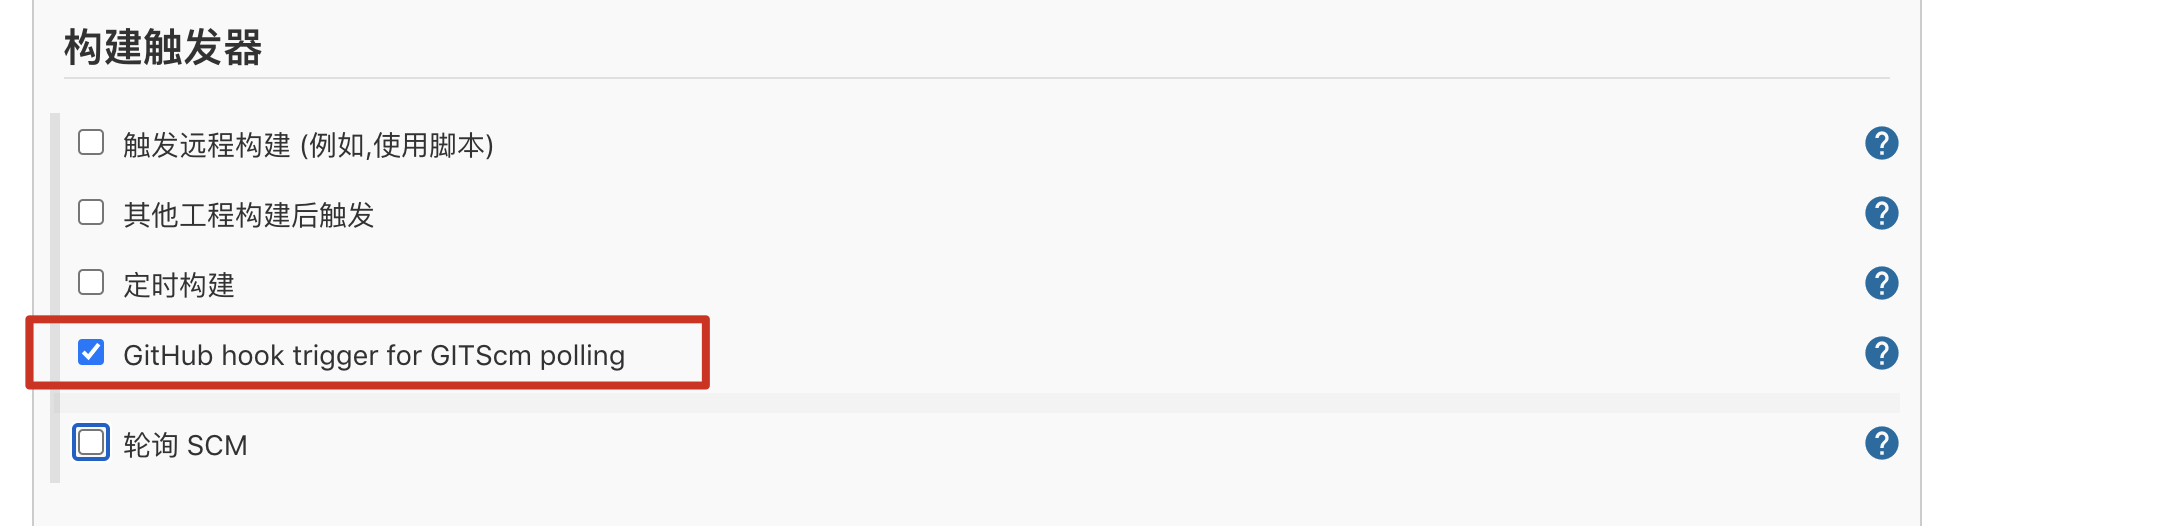
- 构建触发器,勾选 GitHub hook trigger for GITScm polling 即可
- 设置超时的处理,解决 jenkins git timeout,设置时间为 60 分钟。
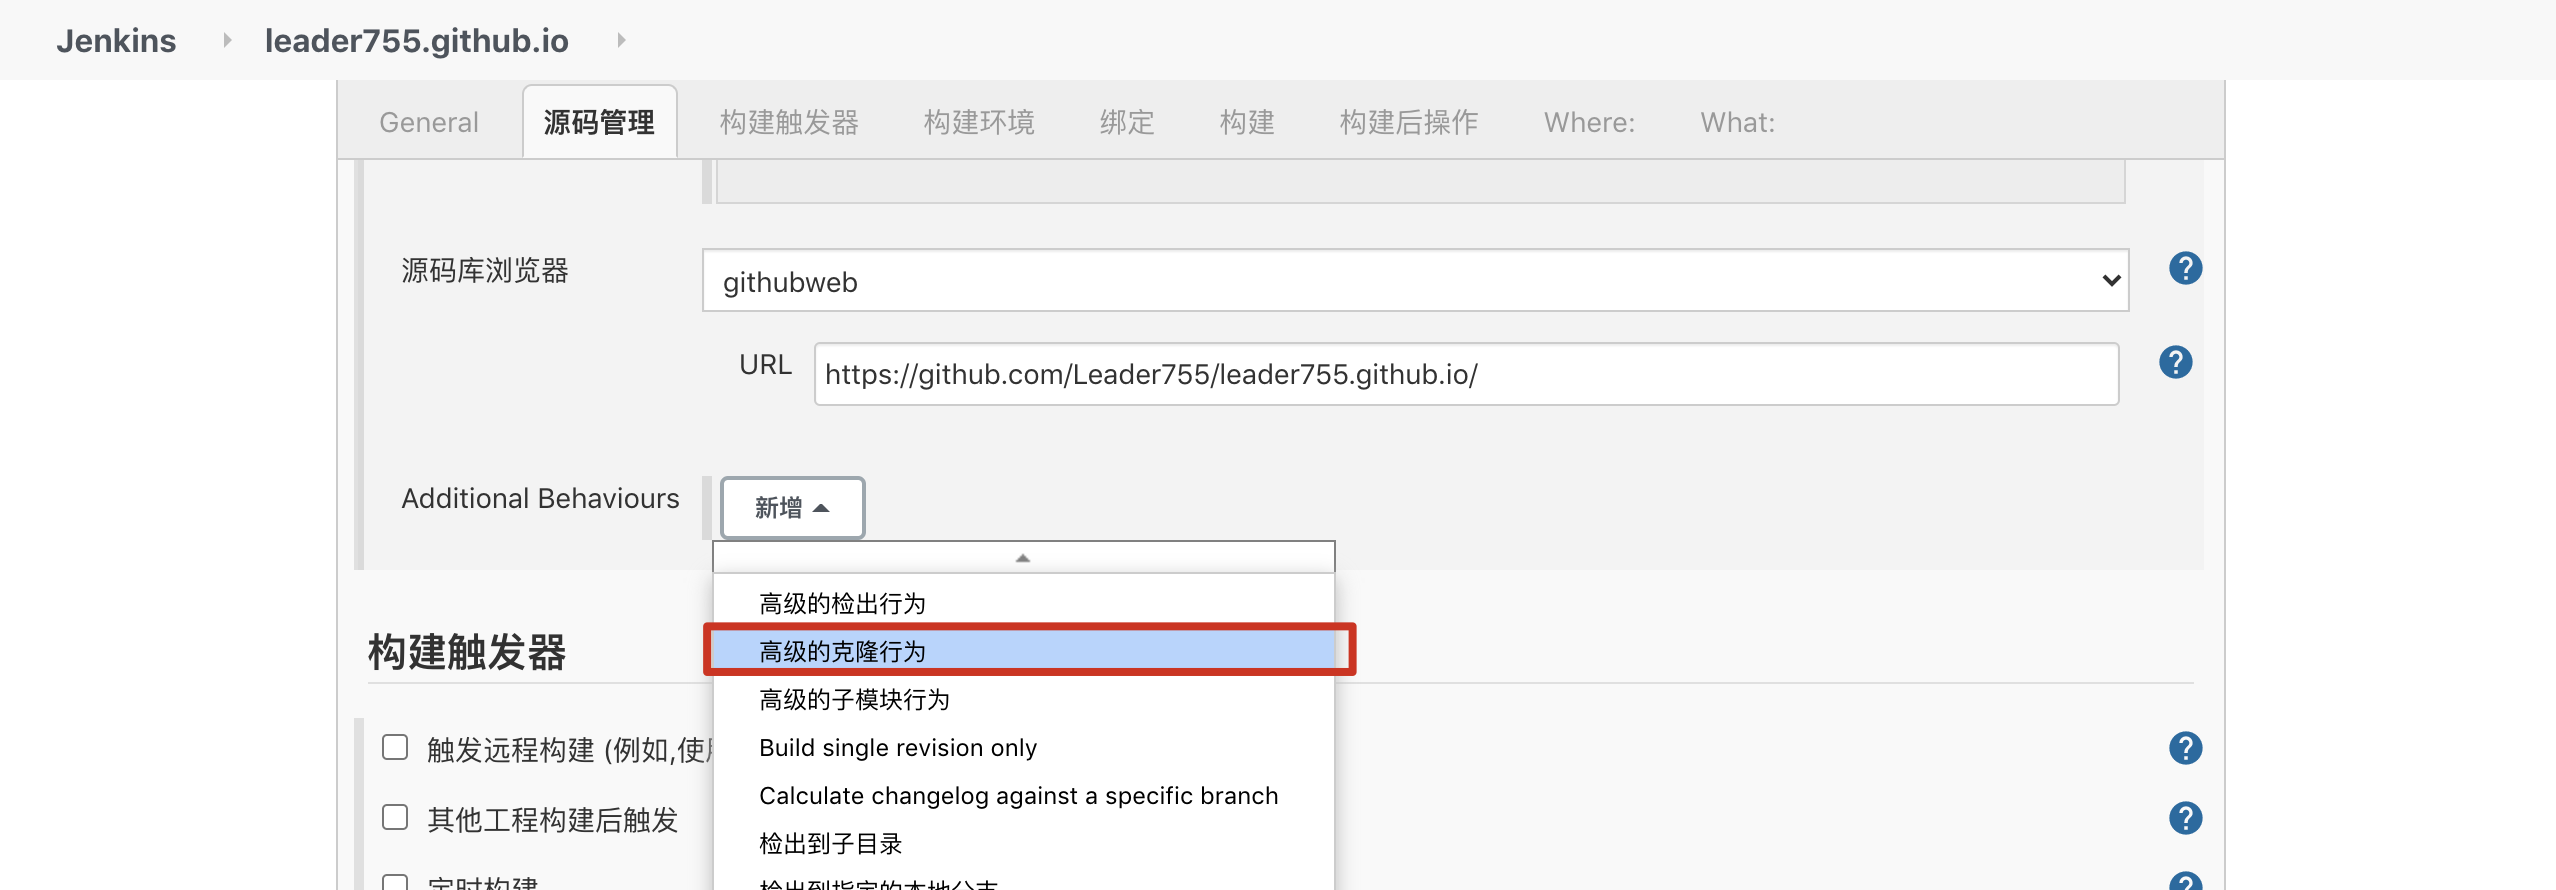

- github 设置代码变动自动触发构建
- github 设置 GitHub webhooks(具体需要持续集成的项目),新建或者设置现有项目的 webhooks 选项,url:部署的服务器的 IP + 端口 + github-webhook
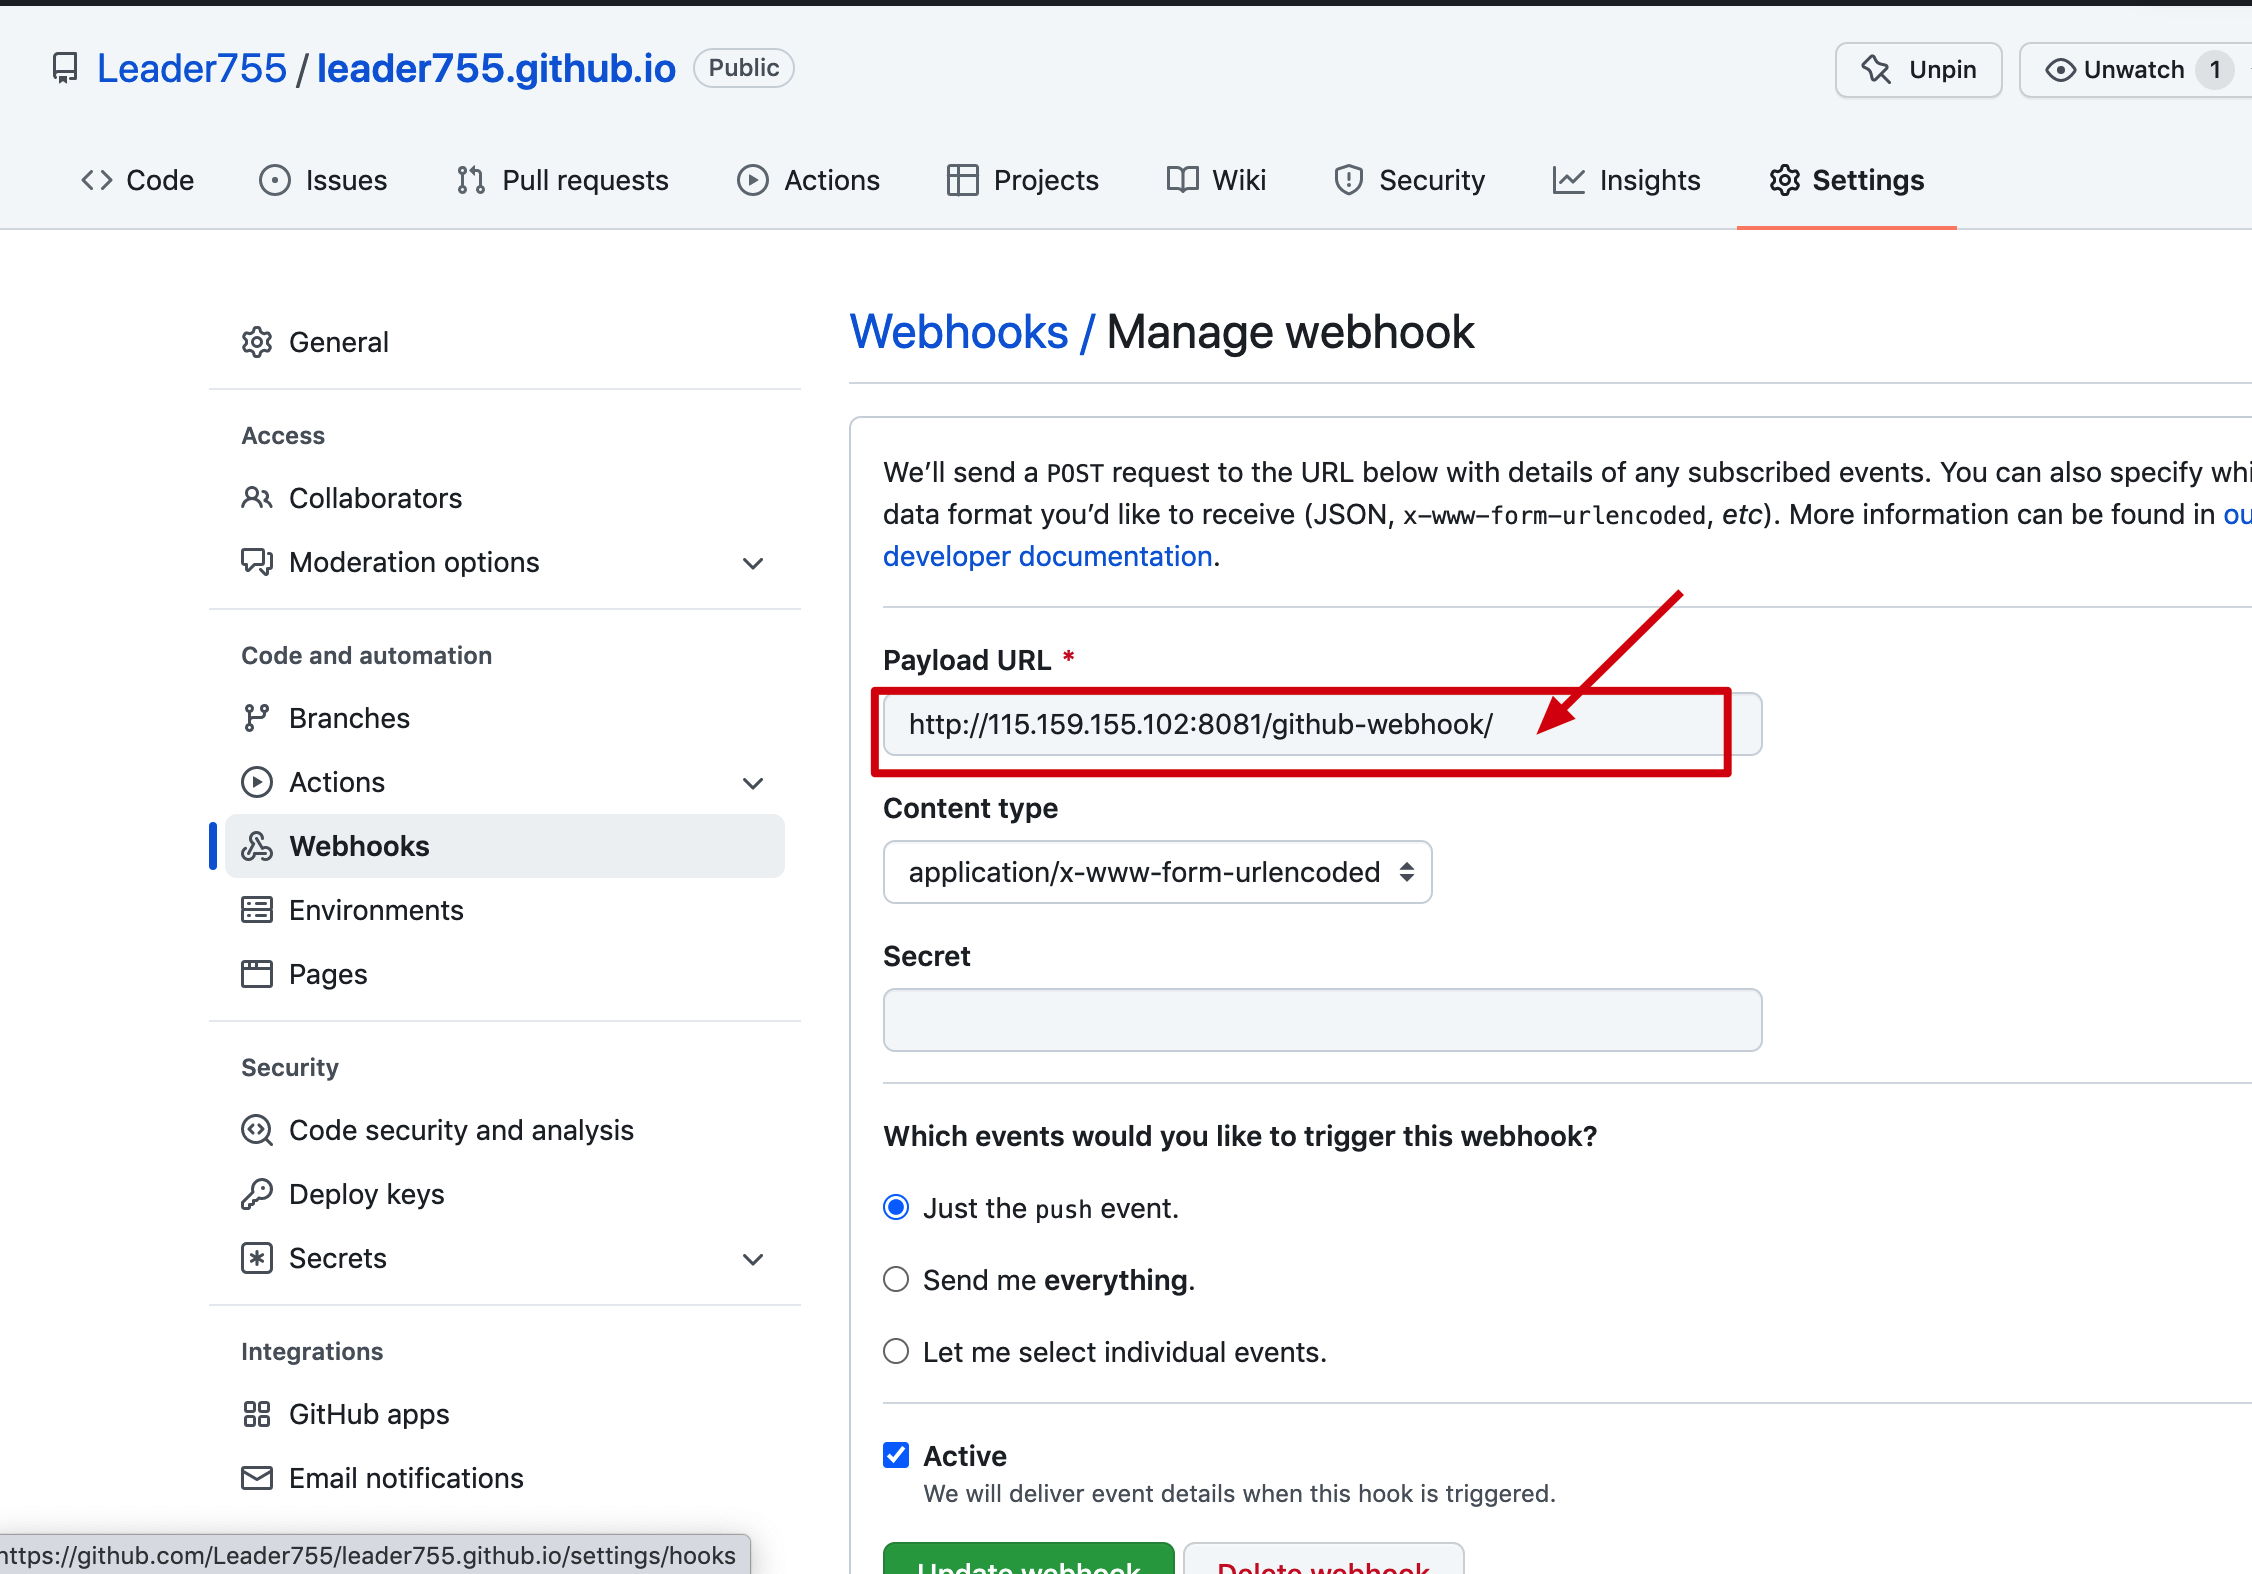
-